Saturday 24 March 2012

Apricot & Apple Mousse

MmmMmmMmMmmMMmmm..... fancy a scrummy dessert which is also healthy?  Well, here is a recipe for what you're after!  This is a recipe which my boyfriend's Gran used to make - and we have had it twice since we were first introduced to it a couple of weeks ago.  It is really easy to make and it's totally scrumptious!

Granny Morris' Apricot & Apple Mousse (Makes 4 portions)

Apricot & Apple puree
Ingredients:

4oz (115g) dried apricots
Rind a juice of half a lemon
1 large apple (I used a Bramley cooking apple), cored and sliced
2oz (55g) caster sugar
1 egg white
Flaked almonds to decorate (optional)

How To:

1. Soak apricots overnight - I didn't cover mine, I left them in a bowl in the fridge.

2. Drain the apricots and put them in a saucepan, reserving enough water to cover them in said saucepan.

3. Add lemon rind and juice, simmer everything until fruit is soft.

4. Meanwhile, pop your egg white in a small mixing bowl and leave it be so it gets to room temperature.  The reason for this is because when it comes to whisking it, it'll work much better than if it comes straight out the fridge :)

5. Add sliced apple to your saucepan and simmer for a further 15 minutes.

6. Puree your fruit in a blender / liquidizer and set it in a large mixing bowl to cool down.  I left mine for about 1 hour.

7. Whisk your egg white with an electric whisk until you reach bubbly soft peaks.  Add the sugar then whisk until stiff.
Yummy Scrummy! :)

8. Fold the egg white into the apricot & apple mixture with a metal spoon.

9. Spoon your mixture into 4 small dishes and pop them in the fridge to set.  I usually make mine at least 2 hours before eating, to give it a good chance of setting well.

10. Serve decorated with flaked almonds (optional) and enjoy!

Yummy Scrummy!  Happy baking!

Siobhan x

Sunday 18 March 2012

Happy Mother's Day!

This year Mothers Day was March 18th.  With Mother's Day and Father's Day, I like to make a little goody-bag with 3 or 4 things inside.  This year, I bought my Mum flowers (which did not fit in said bag!) a book and some yummy chocolates (Thornton's of course!), and I made a mosaic coaster - which I will be talking about in this blog!

This coaster came as a kit, and I bought it in the post-Christmas sale - yes, in December 2011 - from Hobbycraft.  Yes, I'm way too organised LOL!  Anyway, I found these little mosaic coaster kits in the bargain baskets near the till and as I dove in to have a look, I found one with a cute sunflower design, which I thought would be ideal for Mother's Day.  Yes, I think this way all year, which is why I usually have many Birthday and Christmas gifts bought well before the occasion!

Anyway, back to the coaster.  I saw another one which I thought was quite cute, it had a Zebra on it - I decided to buy this one for myself.  I did mine first, as I had never done this kind of thing before, and I thought I could learn from any mistakes so I could make Mum's coaster look better than mine.  Everything worked out just right, so last week I set to work on Mum's mosaic coaster!

 So, first off I had this little piece of ply wood which had the outline for the design on it.  I don't think this is cheating at all, this is VERY helpful indeed!  Next, I had a sheet of transparent double sided sticky tape the same size as the ply wood.  So I unpeeled this and popped it onto the wood.  I had a little bag of tiny tiles and...off I went!  Using the picture on the kit cover of course for reference, it really was very easy.  I guess the most difficult part of this was cutting the tiles.  Nothing comes with the kit to cut the tiles, but I found that an old pair of jewellery snips (used for cutting wire and nylon) were a perfect tool for this.  Also, it's recommended that you wear some eye protection because even though these things are tiny and plastic, when you cut into them they reall can shoot off over everywhere.  I swear I have plenty of tiny little pieces of plastic hiding in several places...!

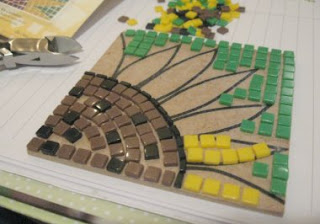
So, as you can see, I started off with the easy part - fitting the square tiles into all the spaces, followed by the smaller pieces.  I discovered that I quickly found my own method of trying to get the right sizes and shapes to fit in all the spaces.  Speaking of which - it  is VERY important to leave little spaces in between each tile - see the close up.  Now, when I had completed the pattern I thought "Well, that doesn't look how I wanted it to..." but it didn't matter.  I wasn't done yet!  Next came the grouting!


So I had this little packet of grout powder, and you just add water to makeit up into a nice thick white paste.  Then, making sure you have plenty of paper or something to protect your work surface underneath your mosaic, you pour the grout onto it, and spread it around.  Yes, it's messy but that's half the fun, right?  I recommend maybe tapping your mosaic onto the surface a few times too - this grout has to get in every single gap between the tiles and tapping it can get rid of air bubbles.  I smeared mine around with theback of an old teaspoon to make sure it got everywhere.  So the end result should be a very pasty version of what you had before.

So I looked at it again and thought "Hmmm, it looks a little better now..." but I still wasn't done.  This grout has to dry and you need to give it plenty of time.  After a couple of hours, the grout had thickened and hardened,and I could still see some parts where there were gaps, so I just touched them all up with the remaining grout I had.  This stuff takes ages to dry so there's plenty of time to fill in any gaps you see.  I also like to make sure that my edges look good too, and that's where you can sometimes see gaps in the grout, especially when you have a runnier consistency.  When it thickens over time, you can easily sort these out :)

So I left it overnight and the next day I cleaned the grout off the surface.  I found the best thing to use for this is wet-wipes, hand-wipes or face-wipes, basically any moistened tissue product.  You'll get through about 4 or 5 of these but they really do the job well and they don't split up and make a mess, like a piece of tissue you've run under the tap.  Wet-wipes also won't soak the grout between the tiles either.  Just rub the surface of the mosaic so you can see all the tiles again in full colour.  Also remember the edges and scrap off any excess grout off the back too, and give that a little going over with a wet-wipe.  Then set it down and admire your work! Wow! That looks great! :)

There's just something really satisfying about making something and giving it away as a gift, whatever it is - knitting, crochet, a mosaic, jewellery, cake......Just doing these little kits was enough to make me think about doing a bigger mosaic project - only if I see it as a kit though.

I'm not THAT good....yet... ;)

Happy grouting!

Siobhan x


Monday 12 March 2012

Easter Crochet

My latest crochet project is for Easter - I usually go out and buy little baskets to put my chocolate eggs in to give out to my family, but I thought I would attempt to cut costs this year by making little pouches instead!  I have lots of wool here which I haven't used for anything.  Why?  Well, it's the downside of buying wool online.  Although it may be cheaper to buy online, sometimes the colour isn't exactly what you thought it was according to the photo on screen.....!!  Anyway, I had a blue and a purple which I thought would go with a nice bright yellow ribbon to look nice and Eastery, so that's what I did:
Cute, right? :) The best thing about these is that you can make them as small or as large as you like! What I did with these was try a different pattern or two in the middle before reaching the last part to finish off.  This gives each pouch a different pattern so no two will look the same.

I got the pattern from here: http://roundshape.wordpress.com/2010/06/01/round-crochet-medieval-purse/ where it is called a "Medieval Purse".  I guess the size also depends on the wool you're using too - I like fairly chunky wool so this one measures about 11cm high and about 10cm in diameter.  Of course, the wool stretches with whatever you put inside which can be a good thing if you have - like me - a number of little chocolate eggs to put inside them :)  I haven't got the chocolate yet so I hope I haven't made these pouches too big!

And no, I don't mean I've eaten the chocolate - I really haven't bought it yet!

Happy crafting!

Siobhan x

Monday 5 March 2012

More knitting exploration!

Yes, it seems I have become somewhat obsessed with knitting and crochet at the moment, I have a couple of projects on the go which I will blog about eventually, but I wanted to tell you about this Etsy store I have discovered belonging to ButterflyLove - based in the UK, this shop sells really cute amigurumi plushes AND patterns, and yes I bought one (you get them via email in PDF format) and tried it out - and love it!

Amigurumi is the Japanese art of crochet or knitted plush toys and there are a lot of them around at the moment - knitting and crochet are both coming back as a trend right now, and as I have said in my previous post, there are many Etsy stores selling them AND the patterns.

Now, this one that I saw in ButterflyLove's shop was something I could not resist getting!  I bought the pattern for this:
It is a planet and moon!  You need a wool with a stripey kind of pattern, but I was really pleased with this!  So much so in fact, I will be making more for a couple of other people as gifts.  It's really quick and easy to make, and you don't need to know any complicated stitches.

The only thing you really need to know is how to knit 2 together - which is pretty self explanatory - and how to "increase" stitches.  You can easily find out several ways of increasing the number of stitches on your needles, either in books or even on Youtube - I have used Youtube for many knitting and crocheting problems and I find it very helpful, especially as you can watch someone doing it as it is explained.  Everyone will have their own preferred method of increasing, and mine is to knit (or purl, depending on your pattern) in the front and back of a stitch, which is one of the visible and decorative ways of increasing.  Here's a good Youtube clip of it being explained HERE.

Happy knitting!

Siobhan x