Monday 18 January 2010

Christmas toppers for gifts

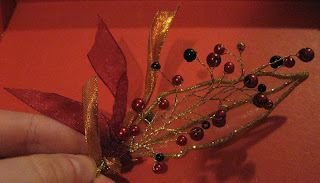
Hi again folks!  Right, have you saved all your bits and pieces from Christmas?  Well, this blog will be about creating beaded "toppers" which can easily be arranged and glued on the top of Christmas gifts instead of bows.  I think it would make gifts look extra special, even more so if the gift is of the size of, say, a bracelet or watch, a bangle or a necklace.

Okay, so its very straightforward.  Over Christmas out crackers are usually ones with interesting patterns (which I salvage and flatten the card for use in Christmas Cards), and little beady bits and ribbons.  Its these beady bits and ribbons which I make the toppers out of, and once you see how simple this is, I bet this year you will be looking in the shops for crackers with little bits you can save and recycle yourself! ;o)

First off, I unwind the beady bits.  Usually its a piece of thin wire with a bead at either end.  Be careful with some of these because the beads can pop off if they have just been glued on the end.  Unless you know how to re-attach them, you may be throwing some beads away.

Next, I twist them together by taking both beads in my fingers, and twisting the wire to create a "stem".   Then I simply take a couple of twists and ttist those together to make a little bouquet, if you will.


The next thing is to hide the wire twist.  Now, along with my crackers came these neat little ribbon bits.  I simply unwind 1 pieces of ribbon - different colours but going together nicely - and I tie each one individually around the wire.  Try to uncrinkle the ribbon as much as you can so you can cover as much of the wire as you can.  Then that's pretty much it - all that's left to do is arrange the ribbin in a way which looks quite nice - I usually go with the "bouguet" look, tucking the ribbon behind the beads, making sure the knots in the ribbon are at the back of the entire piece.  Glue in place and then you're ready to attach more to it, or jus tpop onto a specal gift.  Here are some more photos of what I have done with others.  Have fun! :o)


Saturday 9 January 2010

BRRRRRRRR!!!! Knit something warm!

Brrr!!  It's so cold outside isn't it?  I don't know about you, but I hate the cold!  I'm not a big fan of snow, as I prefer to look at it whilst drinking a hot chocolate, rather than go out and play in it (well, yes I used to make snowmen when I was little but that was then....this is now...!!).

Anyway, I have discovered KNITTING, and I am SO incredibly addicted to it!!  I have knitted lots of scarves and I thought I would post some up so that, if you are feeling chilly, looking at these will make you feel warm, and / or if you want to know what certain stitches might look like, here are the results! :o)

First off, I knitted in moss stitch and this was the result:

And I LOVED making the tassles!! :o)  You can look us moss stitch anywhere but I am pretty sure its K1 P1 every row, but you have to remember to Knit the Pearls and Pearl and Knits on the next row.   I used 4 balls for this one.

If you use the same pattern and Knit the Knits and Purl and Purls, you will end up with a rib stitch, like this one:


Now, you might not be able to see the ribbing as such, but the wool seems to constrict and get closer together when you do a rib, so if you want to do a rib stitch and be able to see the knit and the purl lines, be sure to add a couple more purls which will make it wider, yes, but you will be able to see the ribbing.  I used 4 balls for this one too.

Next up is this one:

Now, the pattern for this one is here: http://knitting.designedlykristi.com/freepatterns/DKlavishscarf.pdf and mine looks different because I put more stitches onto the needles to make a slightly wider scarf, therefore not as long as the one on the pattern.  I am kind of regretting making it as wide as I did, but it's all experience, isn't it? :o)  I used ONE ball of wool for this one - the pattern is for one ball but as I said, I began with more stitches therefore its wider and consequentially shorter.  And yes, you have large holes running down the sides where you thread the ribbon - or whatever you like - and create tassels with them too!

The final one I made was this one:
I made the pattern up myself.  Its K2 P2 (wide rib) and remember to Knit the Knits and Purl and Purls!!  Do this for about 10 rows.
THEN switch to:
Row 1: K3 P3
Row 2: K1 P1
And do that for about 10 rows.  Alternate this pattern and be sure to start and end each row with a knit stitch for a nice border.  This pattern also means that your scarf will be slightly wavy! :o)  4 balls used for this one too.  I also began and ended with the wide rib just to make it look more symmetrical I guess!

I love using chunky needles for these scarves, but anyone can use whatever they like.  I like to use chunky wool too, I find it so much more therapeutic! :o)

Hope you have your Christmas crafting leftovers from crackers and cards......my next blog will be of a Christmas theme.  I know, Christmas is just over, but in the crafting world, it's always Christmas! ;oD