Monday, 25 July 2011

A very productive week!

I know I know...I meant to blog last Wednesday LOL!  Actually last week was pretty busy for me.  Wednesday I went to a book launch, had a vaccination booster jab and I was creating jewellery like crazy!

So here is what happaned - last weekend I checked my email and found one from www.moo.com - this is where I have ordered my stickers from to put on my jewellery boxes topersonalise them and I think moo.com are brilliant!  Anyway, this email said that they were doing a 30% of EVERYTHING they printed until Thursday midnight last week.  When I opened the email, this gave me 4 days to make enough jewellery so I could put photos of my work on the reverse of the business cards I had designed!  Yey!

So, Monday through to Wednesday I was creating goodness knows how many necklaces, and on Thursday I spent the day taking lots and lots of photos of them.  I filled my camera with 480 photos!  Wow.  Anyway, Everything turned out really well apart from a few photos of the necklaces on the busts with turned out darker than I would have liked.  Still, it was the close up photos which I was going to use to put on the business cards, and with a little tewaking of the OTHER side of the business card, I managed to put my order in and sort it all out by 9pm Thursday evening and I got 30% my order of 200 mini cards.  Phew!

So you see, it really has been a busy week but I'm glad it happened.  I had a deadline so I made jewellery like crazy.  This doesn't mean I'm not going to make much jewellery this week - last week sort of threw me into it and I feel like I have a flow going, and I'm ready to play around with more designs.  I am still planning on begining to launch everything mid - late August, but something else may come up before then which may delay it a week.  It's all got to do with a friend in the States and the issue of shipping her cat over to her by September 1st....but I won't go into that LOL!

Anyway, everything is pretty much on schedule, and this Wednesday I am going to the London Jewellery School for a "Business Day" class - I really hope it's going to be helpful and not repeat everything I've already read about!  I'm looking forward to it actually.  I just need to print out a map to find out where everything is and I'll be fine.  Also hoping there might be a Starbucks close by so I can have some lunch there :)  I shall write about it in my next post :)

Thursday, 14 July 2011

Sneek Peeks on experimental jewellery making!

Well this week has been quite productive for me, I must say.  Productive in two senses - I have been discovering what I can and can't do, and I have actually made some jewellery!  I have been playing around with beads which I may or may not sell online and perhaps keep them for potential craft fairs.  I'm not sure, we'll see.

Anyway, I had lots of teeny tiny seed beads which I thought I would use to try my hand at bead sewing and weaving.  I tried a few things and actually found the process...not difficult as such but incredibly time consuming.  I know people who do this all the time can do it really fast, but the smallest thing took me 40 minutes to make and realistically, I thought perhaps this wasn't such a good idea!  I did make two charms which could be put onto a keychain though!  I decided to keep some beads and pack others into small bags.  I gave them to my boyfriend who took them to work where his colleague's 10 year old daughter apparently squealed with delight upon receiving more beads!  She's obviously better suited to this bead weaving lark than I am!

Other techniques which I tried and decided were not for me included wire crochet and wire knitting.  As great as it looks, I found these really difficult...and painful on the fingers...!  However, I continued making things and trying things out - I tried crocheting cord with the larger seed beads which looked allright, I have to admit.  I also tried macrame, which I remember doing a bit of at school and not too long ago - I just had to remember which cords went where and I was off!  Macrame doesn't take me too long - nowhere near as long as beadweaving anyway - so this might be something I could use with the remaining non-gemstones which I have in my collection.  Something which I was successful with was creating a few necklaces with some wooden beads, some of which a friend had given me before she move to the States (Thankyou Liv!), which included a HUGE pendant which I ended up making an improvised bail for.  No really, it was a case of threading the wire through the hole and thinking "Oh. What now?" - I had not thought it through but it turned out good in the end.  I thought copper worked well with the rest of the necklace.

The next thing I did was a bit of wire-wrapping.  A while ago I had won some large wooden beads in a little magazine competition (I love beads. ANY beads. A competition to win some is something I cannot ignore, regardless of what beads there are...!!!).  They were plain and black, and I had NO idea what to do with them.  Fortunately, I had kept many blog posts from other people online who make jewellery and as I was going through them wondering what on EARTH to do with these plain wooden beads, I came across a tutorial for wire-wrapping sea-glass.  I didn't look at the tutorial at all - I saw the photos.  I tried it with copper wire and the result was very pleasing!!

I have to admit that I have tried wire-wrapping before and I dont' have any luck with non-drilled beads.  I personally find it so much easier to have a drilled bead (like these wooden ones here), so I can create a bail at the top, take the wire through the drilled hole, and wrap it around the bead that way.  Yet another thing discovered. I really enjoyed creating these actually, and I honestly think the copper wire works REALLY well with the black wood.  I think silver would also have worked well but these were meant to be practice pieces which I am now keeping as is.  Trouble is....I want more of these wooden beads to wire wrap and I have NO idea where to get some from LOL!  I'm sure I will find some eventually.

Anyway, this is what I have been up to as of late, and next week I hope to have some photos of some gemstone beaded jewellery which I have been making in order to sell online.  Well, maybe it'll be another "sneek peek" as I'm not putting them up yet - I'm building up stock in preparation to "launch" my shop on Etsy! :)

Wednesday, 6 July 2011

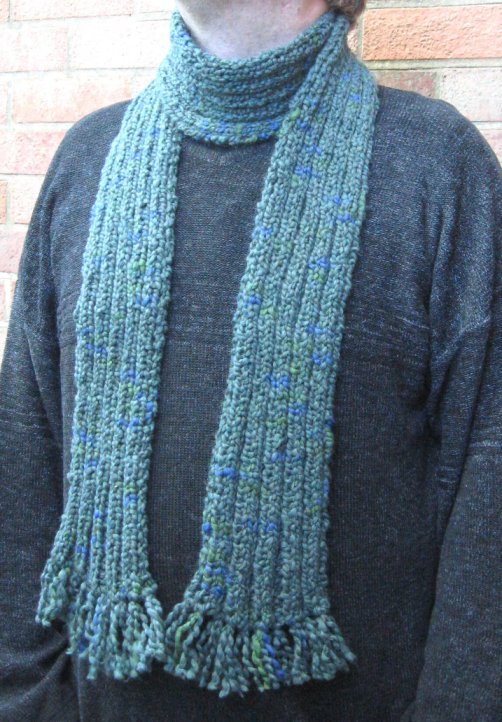
Green, grey and fuzzy!

Yes, it's another scarf - as I said, I am making rather a few this year for Christmas!  This one is another simple double rib scarf like the last one, but the wool is different.  This is a sage-green wool with blue spots called "Wendy Mistral Chinky", and is a very similar wool to the grey one I knitted AGES ago.  This wool is 29% wool, 68% acrylic and 3% polyester, and I used 6.5mm needles to knit.  I am very pleased with this scarf, it's a little bobbly in texture, but the wool is quite wavy.  I added tassles as I did for the other one - actually I find tassles very therapeutic to do LOL!

Anyway, I would say who this is for but he might be reading this blog so I'll just say it's a gent's scarf....and no, it's not for the model in the photo - my boyfriend!  He's not really a scarf person, but he wanted the grey scarf I mentioned earlier.  Actually, speaking of that grey scarf - I actually knitted a hat for him to match, which was my first time using circular needles, using the same rib stitch as the scarf.  In all honesty I'm not really a huge fan of circular knitting needles, it kind of irritates me having to push the wool around constantly!  But I think I ended up with a nice hat.  I have tried crocheting hats but it doesn't really seem to happen for me!  I'll be posting a few of my crochet results at some point - the successful ones of course!

Lastly, regarding the beads - I have began to play with seed beads and bead stitching and weaving.  It's nice to do, but for me as an inexperienced person at this particular craft, it does take me quite a long time.  I kept imagining how long people take to make those huge necklaces with all that intricate bead weaving!!  Anyway, the point of doing it is part of my voyage of creative discovery, and I think I have to say that bead weaving and stitching is not really for me.  But I tried it - and this is what I'm figuring out!  I'll get on to the gemstone jewellery soon, I know I will! :)

Wednesday, 29 June 2011

A simple warm scarf

Before I show my scarf off, I'll just provide an update regarding my handmade jewellery!  I have made quite a bit of progress - although it won't seem so to some - I have created a website on which I just need to purchase the URL and upload photos, plus I hav an Etsy widget on there so people can go straight to my store if they like what they see - this widget will make it onto this blog when I start putting new items up for sale.  I have a Twitter acount which is ready to go, a Facebook page which is ready for photos, and I will be working on combining the two to save time on advertising and promoting - I hope I can use Tweetdeck for this and have it sent to my Facebook page!  I have designed business cards too, but I need photos of new jewellery which I plan on putting on the other side of them to give the cards a little bit of interest.  Other than that, I think it might actually be time for me to start experimenting with new techniques!  I can't wait!  In the meantime I have a book about "Web Marketing for Dummies" although I honestly feel I have read enough about that these past 2 weeks that I could probably write my own book about it!

Anyway, my latest knitting project is a scarf for a friend - this one is for Christmas so it needs to be warm in time for the January and February chill!  I LOVED this wool and I still have a ball of it left to play with.  It's SIRDAR Escape Wool Rich Chunky (51% wool, 49% acrylic) and I knitted this one on 6.5mm needles.  Not too big, not too tiny.  The colour is a really vivid blue from dark to light to dark again.  I want this scarf for myself but I have made it for a friend and it will be given to that friend, come Christmas!

This was just a simple double rib pattern, great to do in front of the TV in the evenings (which is when I usually knit) as there is little room for error, although I probably went wrong a couple of times, but its hard to notice really.  It's soft and of course it has tassels, I love making those!  Very easy to do with a 3 - 4 strands of wool and a crochet hook to pull it through.  Simple, soft and warm :)

Wednesday, 22 June 2011

Exploring my Creativity

Over the last few weeks I have been researching and reading up on running a small business and marketing, all the ins and outs of it.  I already have a store on www.etsy.com but I haven’t really been able to market it properly or sell a great deal of what I make.  What do I make?  Jewellery.  With silver wire and gemstone beads.  I currently have  a schedule which I plan on keeping to (hopefully...!) and part of my list of things to do is a blog.  Of course, I have this ‘Creativity Blog’ which I will use to post up the Jewellery which I make, but this will happen later.

Before I go ‘full steam ahead’ with my Jewellery, I plan not only to read up on everything I can find which is essential to run a small business, but in the meantime, I plan to blog about what I am creating in the meantime, and about me exploring my own creativity.  The aim of this is not only to make lots of things I can give away as gifts, sell to friends and family, online or at craft shows (the latter of which I have yet to do!), but I want to find out what I can do, what I am natural at, what I am terrible at, what I hate doing, and what I love doing.  I have no idea how long this process may take, but at the moment, the Jewellery business will happen after my exploration of Creativity.

So, let me begin by talking about my current crafting obsession – knitting and crochet!  I learnt to knit before crocheting and I can say I can do both.  But some things do elude me – I have tried crocheting a hat several times and I just cannot get the tension right for the rim!  I either end up with floppy, flat rims and a hat that just kind of sits on the head and easily flops off, or I go to the other extreme and end up with a beret sort of hat with a rim which is simply impossible to fit on anybody’s head.  I have, however, knitted a hat which was successful, although I haven’t knitted one since – this is something I will be pursuing at some point!

In the meantime, as you can see on my blog AGES ago, I knitted a few scarves, and although I have successfully crocheted a couple of flower brooches as gifts, I am mostly knitting – lots of Christmas presents!  But first let me show you my first crochet scarf.  This is a simple straightforward pattern combining three rows of 203 double crochet stitches, and a border of shells all the way around the edge.  I got this pattern from “The Happy Hooker” (Stitch ‘n Bitch Crochet) which is a book I cannot recommend highly enough if you want to learn how to crochet – because I learnt from this book!

In the book it looks a bit larger, wider spacing between stitches, but then again I always come out with something different from patterns because I tend to buy the wool and think about the pattern later!  I thought this scarf looked very pretty in pink and it has a slightly floral feel to it thanks to the shell border and the mottled pink colour.  A spring/summer or summer/autumn scarf I think.

Saturday, 18 June 2011

Springing back into action

Wow.  It has been over a year since I last blogged about my creativity.....!  Well, certain things kind of distracted me really.  Stuff at work got to me too much and thinking about that kind of took over......

BUT.....I am ready to blog again, and I am hoping to continue blogging more often.  To cut a long story short, I took redundancy at work at the end of March 2011 and I feel fantastic!  I'm not too sure what I'm going to do but for now, I am enjoying being creative again, and being able to devote the time I want to it as well.  Not only this, but I am planning on creating and selling lots more handmade jewellery online, via my Etsy shop.  I had one set up for a while, but now is the perfect opportunity not only to play with my creativity but to see if it can make me some money!

So basically what I am saying is that I am back, I'm being creative and I am planning on not only sharing my creativity more often on this blog, but I hope to be sharing my experiences, ups and downs, along with some cheeky advertising and links to my Etsy store.  So keep your eyes peeled for more frequent posts.... :)

Siobhan x

Thursday, 1 April 2010

Chocolate Pastries

Chocolate Pastries are SO easy to make.  They are pretty much like Pain-Au-Chocolats.  All you need is roll-out puff pastry and some good quality chocolate.  I made these with Jus-Roll "all butter" puff pastry and a bar of Lindt dark 70% chocolate, which is the darkest I can go and it goes perfectly with the pastry.  Don't forget to have icing sugar handy to dust, and some milk and a pastry brush handy.

First off, put your oven on at Gas 7 / 220C/ 425F.  Our oven can only acommodate one tray per shelf, so I baked one tray at the top and one tray in the middle of the oven, so be sure to adjust your shelves like so.  Next, get two baking trays and line them with greaseproof paper.

Okay, so roll out your puff pastry.  We used leftovers from making the Bakewell Pudding (see blog contents) so this was handy.  Don't roll it out too thin or the pastry won't puff up as much.  Cut your pastry into 3.5" or 9cm squares and set aside.  Take your bar of chocolate and break it up into small pieces.  You don't need to chop it up tiny with a knife, but its handy to have small squareish pieces!

Fold one of your pastry squares in half and open up tp see the crease.  Place some chocolate pieces in the centre of one half, leaving about 1cm around the outer edges.  Brush these outer edges with a little milk, fold over the other half of the square and press down the edges of the pastry with a fork to seal it.  It doesn't matter if you poke a hole in the top of the pastry by accident! :o)

Place all your little pastries onto the baking trays giving plenty of room for the pastry to puff out.  I managed to fit in around 4 per tray.  Brush the top of each one with a little milk, then pop them in the oven for 15 - 18 minutes until golden and puffed.  I usually take out the top tray, and move the tray from the middle shelf onto the top for another 3 minutes to brown them off.

Put them onto a cooling tray and dust with icing sugar.  Leave to cool a little bit before eating - the chocolate inside will be quite hot so you don't want to burn your tongue :o)  Enjoy!